怎么新建MySQL数据库
发布时间:2021-04-16
作者:admin
阅读:2312
阅读:2312
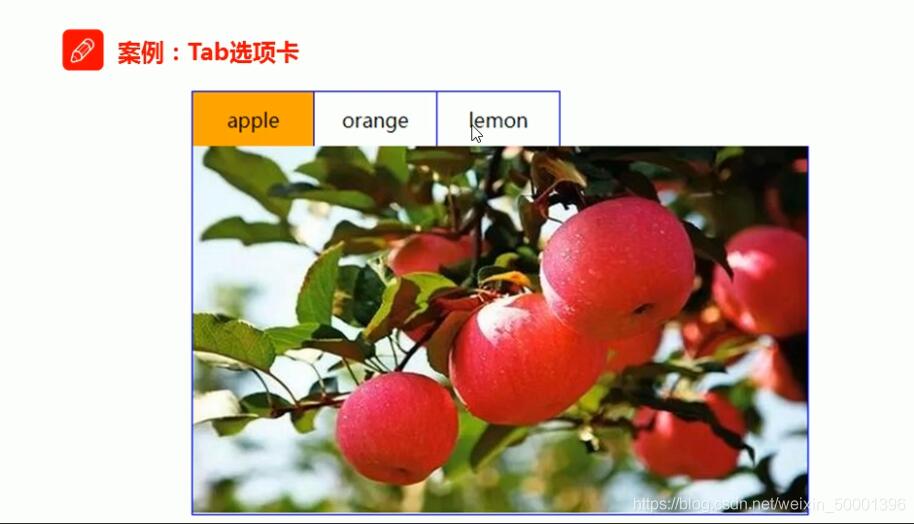
这篇文章主要和大家分享用vue实现切换图片效果的小案例,点击按钮可以实现向前切换,向后切换和顺序切换的效果。下面我们就来看看具体的实现代码。
Tab选项卡
实现步骤
1、实现静态UI效果
用传统的方式实现标签结构和样式
2、基于数据重构UI效果
将静态的结构和样式重构为基于Vue模板语法的形式。
处理事件绑定和js控制逻辑:
设置基本样式
{
 overflow: hidden;
 padding: 0;
 margin: 0;
 }

 .tab ul li {
 box-sizing: border-box;
 padding: 0;
 float: left;
 width: 100px;
 height: 45px;
 line-height: 45px;
 list-style: none;
 text-align: center;
 border-top: 1px solid #ccc;
 border-right: 1px solid #ccc;
 cursor: pointer;
 }

 .tab ul li.active {
 background-color: orange;
 }

 .tab ul li:first-child {
 border-left: 1px solid blue;
 }

 .tab div {
 width: 500px;
 height: 300px;
 display: none;
 text-align: center;
 font-size: 30px;
 line-height: 300px;
 border: 1px solid blue;
 border-top: 0px;
 }

 .tab div.current {
 display: block;
}
实现静态布局
<div id="app">
 <button v-on:click="handla">向前切换</button>
 <button v-on:click="handlc">单向循环切换</button>
 <button v-on:click="handle">向后切换</button>

 <div class="tab">
 <ul>
 <li :class="currentIndex==index?'active':''" :key="item.id" v-for="(item,index) in list">{{item.title}}
 </li>
 </ul>
 <div :class="currentIndex==index?'current':''" :key="item.id" v-for="(item,index) in list">
 <img :src="item.path">
 </div>
 </div>

</div>
实现具体功能
<script type="text/javascript" src="../js/vue.js"></script>
 <script type="text/javascript">
 /* */
 var vm = new Vue({
 el: '#app',
 data: {
 currentIndex: 0,
 list: [{
  id: 1,
  title: 'apple',
  path: 'img/apple.png'
 }, {
  id: 2,
  title: 'orange',
  path: 'img/orange.png'
 }, {
  id: 3,
  title: 'lemon',
  path: 'img/lemon.png'
 }]
 },
 methods: {
 handle: function () {
  if (this.currentIndex < 2) {
  this.currentIndex = this.currentIndex + 1
  }
 },

 handla: function () {
  if (this.currentIndex > 0) {
  this.currentIndex = this.currentIndex - 1
  }

 },
 handlc: function () {
  this.currentIndex = this.currentIndex + 1
  if (this.currentIndex > 2) {
  this.currentIndex = 0
  }

 },

 }
 })
</script>
最终效果

以上就是vue实现切换图片效果介绍,感谢的朋友可以自己动手实现一下,更多vue相关内容大家可以关注其他文章。
免责声明:本站发布的内容(图片、视频和文字)以原创、转载和分享为主,文章观点不代表本网站立场,如果涉及侵权请联系站长邮箱:mmqy2019@163.com进行举报,并提供相关证据,查实之后,将立刻删除涉嫌侵权内容。
相关阅读

长按识别二维码并关注微信
更方便到期提醒、手机管理